"Lab Skills & Safety"
Understanding Laboratory Measurements: Units & Types (Video)
Using Standard Units
Take a look around you - you are surrounded by a variety of objects that come in all shapes and sizes. There are likely just as many ways that you can
measure each of these objects. You can measure their lengths, the area they take up, their volumes, masses, weights, even their densities.
Each of these measurements also has many possible units. For example, you can measure length in feet, yards, inches, meters, miles, and kilometers. Volume can be measured in units such as liters, ounces, and cubic centimeters. Can you see how this gets very confusing very quickly? If you didn't have a standard unit for each of these, you'd end up doing a lot of converting between them. And each time you convert, you lose some accuracy in your measurement because you probably round the numbers a little as well.
So what's a scientist to do? Well, we certainly can't NOT measure things; that's a key component of working in the biology lab. Collecting and analyzing data requires accurate and understandable measurements, so in order to ensure the best data collection possible, we use a standard set of units called the metric system. Most other countries in the world use the metric system for their measurements, and any good biological data should be measured using these units, regardless of the types of measurement you are taking.
Types of Measurement Units
You may or may not already be familiar with the metric system, but the good news is that, even if you have never seen it before, it's quite simple to use. There are specific units to use for each type of measurement, so you never have to guess at which one will be best. Let's take a look at which units in the metric system are standard for the different types of measurements you'll encounter in the biology laboratory.
First let's start with length. In biology, the standard unit of this type of measurement is the meter, represented by a lower-case 'm'. In general, a
meter is about the same as 3 feet, but not exactly. It's more like 3.28 feet, but even that is a rounded number. Think that 0.28 feet isn't important? It may not be for one meter, but if you have 10 meters and you round off that 0.28 feet each time, you end up rounding a total of 2.8 feet away - and that's almost an entire meter!
Area is also measured in meters because area is squared length. So if you have an area that is 3 meters by 5 meters, your area is 3m x 5m, or 15 m^2.
Interestingly, though the definition of the meter has since been changed, the length of a meter was originally intended to represent one ten-millionth of the distance on Earth from the equator to the North Pole!
The standard unit for volume is the liter, represented by an upper-case 'L'. One liter is about the same as 33 ounces, but again, not quite. A more accurate conversion is 33.81 ounces in each liter, or about 4 cups. See how quickly this gets messy? This is exactly why we stick with one unit for
each type of measurement, in this case, the liter.
For mass (which is NOT an object's weight!) we use the standard unit of kilogram, represented by the letters 'kg'. Think of a quart of milk and
that's the amount of mass you're looking at here. We don't use pounds because this represents weight, which is actually the force due to gravity. Mass is the amount of matter an object has, weight is how much force that object is being pulled to the earth with. This is an important distinction because if you went to the moon you'd weigh less because there is less gravity there. However, you'd still have the same mass because no matter where you go, you're still made of the same amount of 'stuff' known as matter.
Finally, we measure temperature using degrees Celsius in the biology lab, represented by the degrees symbol and a capital letter 'C' (°C).
Converting between Celsius and Fahrenheit is not as simple as we have seen with the other units of measurement, and we need an equation to help us understand this one. To convert from Fahrenheit to Celsius, we use the equation °C = (°F - 32) x 5/9. If you want to have the temperature in °F, you convert from °C through this equation: °C x 9/5 + 32.
The other important thing to keep in mind is that Celsius is a capital C because it is named after Swedish scientist Anders Celsius, who proposed the
original Centigrade scale. This scale was named as such because it has 0 being the freezing point of water and 100 being its boiling point, and the prefix 'centi' means '100'.
What Is a Meniscus? - Definition, Uses & Lab Examples (video)
What is a Meniscus?
When I was a kid, I baked cookies with my mother. She would always remind me that when measuring the liquid ingredients like milk, oil, and water, I needed to get down and look from the same level as the liquid itself. Looking from above the liquid would produce an inaccurate measurement, which in baking can be quite disastrous.
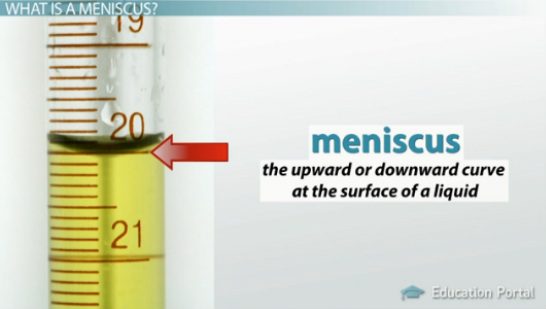
She didn't know the science behind it, but she was right on with her instructions. What she was unknowingly describing is the meniscus of the
liquid. This is the upward or downward curve at the surface of a liquid in a container. A meniscus occurs because of surface tension. The word itself comes from the Greek for 'crescent', and you can easily see how it got its name.
When I was a kid, I baked cookies with my mother. She would always remind me that when measuring the liquid ingredients like milk, oil, and water, I needed to get down and look from the same level as the liquid itself. Looking from above the liquid would produce an inaccurate measurement, which in baking can be quite disastrous.
She didn't know the science behind it, but she was right on with her instructions. What she was unknowingly describing is the meniscus of the
liquid. This is the upward or downward curve at the surface of a liquid in a container. A meniscus occurs because of surface tension. The word itself comes from the Greek for 'crescent', and you can easily see how it got its name.
Concave Vs. Convex
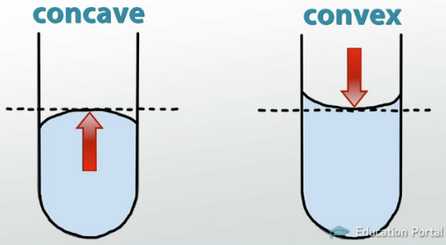
A meniscus may be either concave or convex. A concave meniscus curves downward; if you are looking down from the top, it curves away from you, like the opening of a cave would. In contrast, a convex meniscus curves upward; if you are looking down into the container, the meniscus curves toward you.
Most liquids have concave menisci because the molecules of those liquids are more strongly attracted to the walls of their container than to each other. The liquid 'sticks' to the walls instead of lying flat, causing the downward curve.
Some liquids, like mercury, have a convex meniscus because the opposite is true - the molecules of the liquid are more strongly attracted to each other than the walls of the container. So instead of climbing the walls, they pile on top of each other in the middle, pulling away from the sides of the container.
Reading a Meniscus
In the biology lab, we're probably not working with oil or milk, but we do work with other liquids, and measuring them correctly is just as important here as in the kitchen. Luckily, reading a meniscus is easy if you know how.
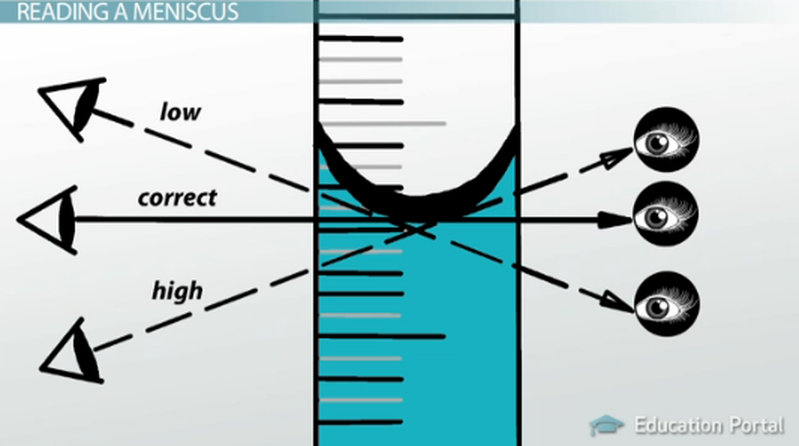
For a concave meniscus, the volume of the liquid in the container is read from the bottom of the curve. You may notice a 'line' of liquid at the very
top, forming the curve itself. The bottom of the curve is the lower side of this line. For a convex meniscus, you do the opposite and read the volume at the top of the curve. Again, you may notice the line that forms the curve itself, but you should read from the very top of that line for an accurate measurement. And just like with baking measurements, always read the meniscus at eye level. Otherwise, your measurement will be incorrect. While this may only produce lousy cookies in the kitchen, mixing incorrectly measured liquids can pose serious safety risks in the lab
A meniscus may be either concave or convex. A concave meniscus curves downward; if you are looking down from the top, it curves away from you, like the opening of a cave would. In contrast, a convex meniscus curves upward; if you are looking down into the container, the meniscus curves toward you.
Most liquids have concave menisci because the molecules of those liquids are more strongly attracted to the walls of their container than to each other. The liquid 'sticks' to the walls instead of lying flat, causing the downward curve.
Some liquids, like mercury, have a convex meniscus because the opposite is true - the molecules of the liquid are more strongly attracted to each other than the walls of the container. So instead of climbing the walls, they pile on top of each other in the middle, pulling away from the sides of the container.
Reading a Meniscus
In the biology lab, we're probably not working with oil or milk, but we do work with other liquids, and measuring them correctly is just as important here as in the kitchen. Luckily, reading a meniscus is easy if you know how.
For a concave meniscus, the volume of the liquid in the container is read from the bottom of the curve. You may notice a 'line' of liquid at the very
top, forming the curve itself. The bottom of the curve is the lower side of this line. For a convex meniscus, you do the opposite and read the volume at the top of the curve. Again, you may notice the line that forms the curve itself, but you should read from the very top of that line for an accurate measurement. And just like with baking measurements, always read the meniscus at eye level. Otherwise, your measurement will be incorrect. While this may only produce lousy cookies in the kitchen, mixing incorrectly measured liquids can pose serious safety risks in the lab
Common Laboratory Equipment: Types & Uses (video)
Working in the Laboratory
Working in the laboratory is one of the best parts about being a biologist. There are so many fun activities to do, experiments to run, and things to
learn. When doing biology lab activities and experiments, there's a whole host of equipment that may be used. Some of this equipment can be quite fancy and specialized, but for the most part biologists use some standard stuff to get the job done.
Taking Measurements
When running experiments, taking accurate measurements is crucial. There are a wide variety of measurements that can be taken depending on the task at hand. Some of the most basic measurements in the lab involve length, volume, and mass of objects or substances.
The most common way to measure length is with a ruler. This can be a short hand-held ruler or a long meter stick. To measure the mass of something we use a balance. This special lab scale gives us mass readings in grams. Thermometers are the instrument we use to measure an object or substance's temperature in °C.
There are a number of ways to measure the volume of a substance in the biology lab. Beakers are a common piece of equipment when the substance will be mixed and/or poured into some other container, and they have a special pouring spout just for this purpose. Beakers come in all different sizes. Smaller beakers are more appropriate for mixing smaller amounts of fluid, while large beakers are appropriate for mixing larger amounts of fluid.
If we simply want to measure the volume of a liquid we would use a graduated cylinder, which looks like a tall, thin beaker. Graduated
cylinders also come in a variety of sizes and are much more accurate for measuring volume than a beaker. We also use different types of flasks in the biology lab. Most commonly used is the Erlenmeyer flask, which looks like an upside-down funnel. This piece of equipment is used to hold liquids, but because of its narrow neck is not generally used to mix anything. A Florence flask also has a thin neck, but instead of a cone-shaped bottom it has a round one. This makes it very useful for boiling liquids, but again, not so much for mixing them.
If you're working with very small volumes, you will likely use eyedroppers and pipettes. Eyedroppers are great for adding one drop of liquid at a time, but not good for measuring exact amounts. A pipette is better for this job and there are two types of these. A volumetric
pipette has only one graduation (measurement line) and is used to get that exact volume of liquid. A graduated pipette is not as accurate as a
volumetric one, but because it has many graduations you can measure many different volumes instead of just the one.
Heating & Dissection
Equipment
Speaking of heating things in the lab, there are a few handy pieces of equipment that serve this purpose. First is the Bunsen burner, developed
by none other than its namesake, Robert Bunsen. This produces a single flame that can be used to heat substances. A hot plate is an electric source of heat. You can use this to heat glassware or substances, and some hot plates even have magnetic stirrers in them so you don't have to do that yourself! Many biology lab activities involve dissection of specimens. In addition to protective eyewear and gloves (which you should use any time you are working in the lab), you will probably be using forceps, scalpels, and dissecting scissors. Each of these pieces of equipment will help you cut open your sample properly so that you can investigate what's inside. Additionally, you may also use pins to help hold your specimen open.
Examining Equipment
If you're preparing any kind of sample in the lab you'll certainly want to take a closer look at it. For this, biologists use microscopes, of which
there are several different kinds. Generally, a small sample is taken from the larger experiment and either placed on a microscope slide or in a
petri dish. In this way, you can put the smaller sample under the microscope for examination, which is especially helpful for very small objects
that can't be seen with the human eye. You may also use test tubes in your biology lab experiments. These are quite useful because they can hold liquids for observation as well as running reactions. Most of the time test tubes will be held in a test tube holder, which is handy if you have many test tubes but like most humans only have two hands
Laboratory Safety Techniques: Protecting People and Equipment (video)
The Importance of Lab Safety
One of the best parts about taking a biology course is the labs. There are so many fun activities that allow you to apply your newfound knowledge in a hands-on setting. But lab activities can quickly go from 'oh-yeah!' to 'oh-no!' when proper safety precautions are not observed. Lab safety may seem like a big downer, but it's in everyone's best interest to follow the rules. So, to ensure that you and everyone else in the lab have an enjoyable
experience, let's go over some of the basic safety rules that must be followed in any laboratory setting.
Personal Body Protection
Your mom drilled this into your head, and we're making it a top priority here too - wash your hands. Dirty hands can contaminate your lab materials if you don't wash them before you start your work. Washing your hands after you're done in the lab will also ensure that you don't take away any hitchhikers along with you when you leave. And, while it's never a good idea to touch your face, eyes, nose or mouth while in the lab, if it's absolutely necessary, you should always wash your hands before doing so in case they have chemicals or other substances on them. While we're on the subject of your face, it's important to keep all food, drinks and gum out of the lab. Not only can you contaminate your lab materials, but your lab materials may contaminate your food. Because of this, it's also not a good idea to put anything else in your mouth while in the lab, like pens and pencils.
Lab substances can be dangerous, and you should always treat them as such. Never taste or smell chemicals or other lab materials. Additionally, it's good practice to always wear safety goggles, gloves and a lab coat to protect your eyes, skin and clothing.
Even if you don't have a lab coat, there are guidelines to follow for the clothing you should wear in the lab. In general, try to avoid wearing your nice
clothes as they may become stained. Anything that is loose or baggy can catch on equipment and containers, causing spills or accidents, so these should be avoided as well. The same goes for jewelry and long hair, but you can easily tie back long hair and remove jewelry before working in the lab. Appropriate shoes will protect your feet if you drop equipment or substances. Always wear close-toed shoes instead of flip-flops or sandals.
Containers and Substances
One of the most important things about working in the lab is knowing what you're doing and what you're working with. It's good practice to read through your entire lab ahead of time to prepare yourself for the day's activities. All of your containers and substances should be properly labeled. If
something is not labeled correctly, notify your lab instructor so that they can find you the appropriate materials. Again, don't smell or taste it to find out what it is. Just assume it's hazardous and get a hold of the right stuff. Each time you're done with a container make sure you close it tightly. You
may think that it will save some time to only sit the lid on there so you can easily open it later, but there's always the chance you'll forget the lid isn't on tightly and cause a spill. It's also a good idea to pour your materials into a separate container to prevent contamination in the container, as well as to allow for more accurate measuring.
Accidents and Spills
Even if you're being careful and following all of the safety precautions, accidents still happen. The first thing to do if someone gets hurt, a substance
spills or something breaks is to notify your instructor immediately, no matter how minor the accident or spill may seem. She will best know how to clean up a spill or care for an injury, so it's safer to get instructions first rather than trying to do it yourself.
On that note, it's never safe to pick up broken glass with your hands. Again, if you're unsure how to best clean up broken equipment, ask your lab instructor and she can help you. Even though your instructor is the first step in dealing with an accident or spill, you should always make sure you know where the emergency stations are located within the lab. Each lab will have an emergency shower and eyewash station, as well as a fire extinguisher. Knowing where these are located can save precious time if you end up needing to use them.
Clean Up and Common Sense
A clean lab station is a happy lab station. Keeping your work area clean will reduce accidents and will also make it easier to clean up when you're done with your activities. Cleaning and putting away your lab equipment allows others to use it later. One thing to keep in mind is that each lab substance has specific disposal instructions. Not everything can be put in the trash or poured down the sink,
so check with your lab instructor if you're unsure of how to properly dispose
of your materials.
As you have probably noticed, lab safety involves a lot of common sense. In addition to the previously mentioned lab safety rules, there are a few others worth mentioning. It may seem silly to bring them up, but too often these cause serious accidents or injuries, so we like to cover them just in case. Lab work is fun, but having a good time in lab isn't the same as goofing off. Horseplay has no place in the lab, as you could easily knock something over, causing an accident. Often, we heat materials in the lab, and just like you wouldn't walk away from food cooking on a stove, you should never leave heating lab materials unattended. Make sure you stay with your materials and watch them carefully. Again, just like you shouldn't touch chemicals or materials, you shouldn't touch hot plates or open flames, even when wearing protective equipment.
